Wednesday, June 29, 2011

Std 9 Maths Unit 2

ഭിന്നക സംഖ്യകള്‍

പല കാലങ്ങളിലുള്ള മനുഷ്യന്റെ ആവശ്യങ്ങള്‍ക്കനുസരിച്ചാണ് സംഖ്യകള്‍ ഉണ്ടാകുന്നത്. ഈ ആവശ്യങ്ങള്‍ ചിലപ്പോള്‍ നിത്യജീവിതവുമായി ബന്ധപ്പെട്ടതാകാം. അല്ലെങ്കില്‍ ഗണിതത്തിന്റെ തന്നെ ആവശ്യമാകാം.

എണ്ണല്‍ സംഖ്യകള്‍, അവയുടെ ന്യൂനങ്ങള്‍, പൂജ്യം എന്നിവയ്ക്കെല്ലാം പൊതുവായി പറയുന്ന പേരാണ് പൂര്‍ണ്ണസംഖ്യകള്‍ (Integers).


Continue


Saturday, June 25, 2011

Std 9 Maths Unit 1

രൂപങ്ങളെക്കുറിച്ചുള്ള പഠനമാണല്ലോ ജ്യാമിതി. ഏതാണ്ട് ആറായിരം കൊല്ലങ്ങള്‍ക്കുമുമ്പ് നൈല്‍ നദീതീരത്ത് വ്യാപകമായ കാര്‍ഷിക പ്രവര്‍ത്തനം ആരംഭിച്ചപ്പോഴാണ് ജ്യാമിതിയെക്കുറിച്ചുള്ള കാര്യമായ പഠനങ്ങള്‍ തുടങ്ങിയത്. വിവിധ രൂപങ്ങളിലും വലിപ്പത്തിലുമുള്ള കൃഷിയിടങ്ങളുടെ വിസ്തീര്‍ണ്ണവും മറ്റും കണ്ടുപിടിക്കുന്നതിന് ജ്യാമിതീയ അറിവുകള്‍ അത്യാവശ്യമാണല്ലോ. ഇവിടെ ഉപയോഗിക്കുന്ന രൂപങ്ങള്‍ ബഹുഭുജങ്ങളാ യതുകെണ്ട്, അവയെക്കറിച്ചുള്ള പഠനങ്ങള്‍ പണ്ടുമുതലേ നടന്നിരുന്നു.

Continue

Friday, June 24, 2011

ഏതു ബഹുഭുജത്തിലും ഓരോ ശീര്‍ഷത്തിലും ഓരോ ബാഹ്യകോണ്‍ എടുത്തു കൂട്ടിയാല്‍ തുക 360 ഡിഗ്രിയായിരിക്കും.


Sorry, the GeoGebra Applet could not be started. Please make sure that Java 1.4.2 (or later) is installed and active in your browser (Click here to install Java now)

Monday, June 20, 2011

Geogebra - 8

ത്രികോണത്തിന്റെ കോണുകളുടെ തുക കണ്ടെത്തുന്നതിനുള്ള Applet നിര്‍മ്മാണം

വശങ്ങളുടെയും കോണുകളുടേയും അളവുകള്‍ മാറുന്നതിനനുസരിച്ചുള്ള ഒരു ത്രികോണം സ്ലൈഡറുകള്‍ ഉപയോഗിച്ച് നിര്‍മ്മിച്ച് അതിലെ കോണുകള്‍ അടയാളപ്പെടുത്തുക.

        Steps

    1. ടൂള്‍ ബാറിലെ മൂന്നാമത്തെ സെറ്റില്‍ നിന്നും Line through Two Pointsഎന്ന ടൂള്‍ എടുത്ത് രേഖാഖണ്ഡം (വര) AB വരയ്ക്കുക.

Continue

Applet

Thursday, June 16, 2011

Std 10 Maths Unit 2

വൃത്തങ്ങള്‍

ഒരു മട്ടത്രികോണം വരയ്ക്കണം. കര്‍ണ്ണം 5 cm വേണം. ലംബവശങ്ങള്‍ എന്തുമാകാം. എങ്ങനെയെല്ലാം വരയ്ക്കാം ?

5 cm നീളത്തില്‍ വര വരയ്ക്കുക. അതിന്റെ ഒരറ്റത്ത് ഇഷ്ടമുള്ള കോണും, മറ്റേ അറ്റത്ത് 90o യില്‍ നിന്നു ഇതു കുറച്ച കോണും വരച്ച്, ത്രികോണമാക്കാം.

ഇത്തം കുറേ ത്രികോണങ്ങള്‍ വരച്ച്, അവയുടെ മൂന്നാം മൂലകള്‍ മാത്രം നോക്കൂ.

മുന്‍ പ്രവര്‍ത്തനത്തില്‍ കോണുകളെയെല്ലാം മട്ടമാക്കിയതിനുപകരം 30o, 45o ,60o ,120o മുതലായവ ആയി വരച്ചുനോക്കൂ.


Continue

Friday, June 10, 2011

Std 10 Maths Unit 1

സമാന്തരശ്രേണികള്‍

ഏതെങ്കിലും നിയമമനുസരിച്ച്, ഒന്നാമത്തേത്, രണ്ടാമത്തേത്, മൂന്നാമത്തേത്, ….....എന്നിങ്ങനെ ക്രമമായി എഴുതുന്ന ഒരു കൂട്ടം സംഖ്യകളെ, സംഖ്യാശ്രേണി (Number sequence) എന്നു പറയുന്നു.

ഒരു സംഖ്യയില്‍ നിന്നുതുടങ്ങി, ഒരേ സംഖ്യ തന്നെ വീണ്ടും വണ്ടും കൂട്ടി കിട്ടുന്ന ശ്രേണിയെ സമാന്തരശ്രേണി (Arithmetic Sequence ) എന്നു പറയുന്നു.

ഒരു സമാന്തരശ്രേണിയിലെ ഏതു സംഖ്യയില്‍ നിന്നും തൊട്ടുപുറകിലുള്ള സംഖ്യ കുറച്ചാല്‍, ഒരേ സംഖ്യ തന്നെയാണ് കിട്ടുന്നത്. ഈ സംഖ്യയെ സമാന്തരശ്രേണിയുടെ പൊതുവ്യത്യാസം (Common Difference) എന്നു പറയുന്നു.

Continue
Applet 1.
Applet 2.
Applet 3.
For downloading the deb file Click here
After downloading the deb file, install by Gdebi Package installer method.
Applications --> School Resources --> arithmeticsequence എന്ന ക്രമത്തില്‍ ഇതു തുറക്കാം.

Thursday, June 2, 2011

Central Angle Theorem


Sorry, the GeoGebra Applet could not be started. Please make sure that Java 1.4.2 (or later) is installed and active in your browser (Click here to install Java now)


ജിയോജിബ്ര അപ് ലറ്റുകള്‍ ബ്ലോഗില്‍ Embed ചെയ്യാന്‍
Click here

Saturday, May 21, 2011

Animation _ Lesson 1


KTooN
KTooN is a software application for the design and creation of 2D animation. It is developed by an open community covered under the terms of the GNU, general Public License, meaning that KTooN is Free Open Source Software.Requirements:
256 MB on RAM
800Mhz or higher (Processor Speed)
Disk space: at least 5 MB free
Continue

Tuesday, May 3, 2011

Geogebra - Std 9 ICT Training

ജിയോജിബ്ര

ജ്യാമിതീയ രൂപങ്ങള്‍ നിര്‍മ്മിക്കുന്നതിനും കൈകാര്യം ചെയ്യുന്നതിനുമുള്ള കമ്പ്യൂട്ടര്‍ പ്രോഗ്രാമുകളാണ് ഇന്ററാക്റ്റീവ് ജ്യാമിതി സോഫ്റ്റ് വെയറുകള്‍. ഇത്തരത്തിലുള്ള സോഫ്റ്റ് വെയറുകളില്‍ വളരെയേറെ സാധ്യതകളുള്ള ഒരു സോഫ്റ്റ് വെയറാണ് ജിയോജിബ്ര. ജിയോജിബ്ര പഠനബോധനപ്രക്രിയയില്‍ രണ്ടുരീതിയില്‍ ഉപയോഗിക്കാം. 1.അധ്യാപകസഹായി 2. സ്വയംപഠനസഹായി.

പ്രൈമറി തലം മുതല്‍ ബിരുദാനന്തരതലം വരെ ഗണിതശാസ്ത്രം പഠിപ്പിക്കുന്ന അധ്യാപകര്‍ക്കും വിദ്യാര്‍ത്ഥികള്‍ക്കും ഒരുപോലെ ഉപയോഗപ്പെടുത്താവുന്ന ഒരു ഇന്ററാക്റ്റീവ് സോഫ്റ്റ് വെയറാണിത്.

ജിയോജിബ്ര സോഫ്റ്റ് വെയര്‍ പരിശീലിക്കുന്നതിനു മുമ്പ് ഇതുപയോഗിച്ച് തയ്യാറാക്കിയ ചില പ്രോഡക്ടുകള്‍ ശ്രദ്ധിക്കൂ.

1. Area of Right triangle

2. Exterior Angle Sum

3. Trigonometry

4. Integration

Applications --> Education--> Geogebra എന്ന ക്രമത്തില്‍ നമുക്കിത് തുറക്കാം. തുറന്നു വരുന്ന ജാലകം ശ്രദ്ധിക്കൂ.

ജിയോജിബ്ര ജാലകത്തിന് വിവിധ ഭാഗങ്ങലുണ്ട്. Title bar, Menu bar, Tool bar, Algeba view, Graphic view, Spreadsheet view, Input bar.

Continue


Thursday, April 28, 2011

Embedding - Geogebra Applet

How to Embedd Geogebra in Blog

ജാവ പ്രോഗ്രാമിംഗ് സംവിധാനങ്ങളുപയോഗിച്ചാണ് ജിയോജിബ്ര പ്രവര്‍ത്തിക്കുന്നത്.  ബ്ലോഗുകളില്‍ ജിയോജിബ്ര അപ്‌ലറ്റുകള്‍ എംബഡ്ഡ്  ചെയ്യുമ്പോള്‍ നിര്‍മ്മിതിയുടെ പ്രോഗ്രാം കോഡുകള്‍ മാത്രം പകര്‍ത്തിയെടുത്താല്‍ മതിയാകും.

Click here

Monday, April 25, 2011

Geogebra -- Basic constructions

Construction of Rectangle 1

1.Segment AB

2.Perpendicular line to segment AB through point B.

3.New point C on the perpendiculr line.

4.Parallel line to segment AB through point C.

5.Perpendicular line to segment AB through point A.

Monday, April 18, 2011

Edubuntu Installation

IT@School Edubuntu10.04 (Latest Version ) Installation Guide

1. Restart the computer.
2. Press DELETE button in the key board continuously. Or F2 button
3. Advanced BIOS Features- Enter
4. First boot device- CD ROM
5. Second boot device – HDD (Hard Disk)
6. Press F10 to save and exit the changes in the BIOS – Enter.
7. Insert the DVD and restart the System and wait for some time.
8. Select Install Ubuntu and Click.
9. Preparing to Install – Click Forward.


Continue

Wednesday, April 13, 2011

Geogebra Lesson 3

സ്ലൈഡറുകള്‍
രൂപങ്ങള്‍ നാം നിര്‍ദ്ദശിക്കുന്നതിനനുസരിച്ച് ചലിപ്പിക്കുന്നതിനുള്ള സംവിധാനമാണ് സ്ലൈഡറുകള്‍. സ്ലൈഡര്‍ ടൂള്‍ എടുത്ത് സ്ലൈഡര്‍ ഉള്‍പ്പെടുത്തേണ്ട സ്ഥലത്ത് ക്ലിക്ക് ചെയ്യുക. സ്ലൈഡറിലുള്ള 'a' എന്ന ബിന്ദു -5 മുതല്‍ 5 വരെ ചലിപ്പിക്കും എന്നതാണ് കാണിച്ചിരിക്കുന്നത്. ഇവ നമ്മുടെ ആവശ്യങ്ങള്‍ക്കനുസരിച്ച് മാറ്റാം. തുടര്‍ന്ന് apply ക്ലിക്ക് ചെയ്താല്‍ slider പ്രത്യക്ഷപ്പെടുന്നു.
Continue

Friday, April 1, 2011

Geogebra Lesson - 2

പ്രവര്‍ത്തനം 1.
AB=6cm, AC=7cm, ∠ A= 700 അളവുകളിലുള്ള ത്രികോണം ABC വരയ്ക്കുക.
Steps

1. ജിയോജിബ്ര ജാലകം തുറന്ന് മൂന്നാമത്തെ ടൂള്‍ സെറ്റില്‍ നിന്നും Segment with Given Length from Point ടൂള്‍ എടുത്ത് Drawing Pad ല്‍ ഒഴിഞ്ഞ സ്ഥലത്ത് ക്ലിക്ക് ചെയ്യുക.
2.അപ്പോള്‍ തുറന്നു വരുന്ന Segment with Given Length from Point ഡയലോഗ് ബോക്സില്‍ Length എന്നതില്‍ 6 എന്ന ടൈപ്പ് ചെയ്ത് OK ബട്ടണില്‍ ക്ലിക്ക് ചെയ്യുക.
3.അഗ്രബിന്ദുക്കളില്‍ Right click ചെയ്യുമ്പോള്‍ ലഭിക്കുന്ന drop down menu വില്‍ Show label എന്നതില്‍ ക്ലിക്ക് ചെയ്താല്‍ അഗ്രബിന്ദുക്കളുടെ പേര് ദൃശ്യമാകും.
Continue

Monday, March 21, 2011

Geogebra Lesson -1

ജിയോജിബ്ര (Geogebra)

ആമുഖം : ജ്യാമിതീയ രൂപങ്ങള്‍ നിര്‍മ്മിക്കുന്നതിനും കൈകാര്യം ചെയ്യുന്നതിനുമുള്ള കമ്പ്യൂട്ടര്‍ പ്രോഗ്രാമുകളാണ് ഇന്ററാക്റ്റീവ് ജ്യാമിതി സോഫ്റ്റ് വെയറുകള്‍. ഇത്തരത്തിലുള്ള പ്രോഗ്രാമുകളില്‍ ബിന്ദുക്കള്‍(Points), വരകള്‍ (Lines or Line segments), വൃത്തങ്ങള്‍ (circles) തുടങ്ങിയ അടിസ്ഥാന രൂപങ്ങളും തുടര്‍ന്ന് അവയെ ആധാരമാക്കി കൂടുതല്‍ സങ്കീര്‍ണമായ മറ്റു നിര്‍മ്മിതികളും തയ്യാറാക്കാം. ഈ നിര്‍മ്മിതികളില്‍ നിന്നും രൂപീകരിക്കാവുന്ന ജ്യാമിതീയ ആശയങ്ങള്‍ അത്തരത്തി ലുള്ള എല്ലാ രൂപങ്ങള്‍ക്കും ശരിയാകുമോ എന്നു പരിശോധിക്കുകയും ചെയ്യാം. നിര്‍മ്മിച്ചിരിക്കുന്ന ബിന്ദുക്കളുടെ സ്ഥാനം സ്വതന്ത്രമായി മാറ്റാന്‍ കഴിയുന്നതുകൊണ്ടാണ് ഇത്തരം ആശയ വേരിഫിക്കേഷന്‍ സാധ്യമാവുന്നത്.

1980 കളുടെ ആദ്യ പാദത്തില്‍ നിര്‍മ്മിക്കപ്പെട്ട ജിയോമെട്രിക് സപ്പോസര്‍ ആണ് ഇത്തരം സോഫ്റ്റ് വേറുകളില്‍ ആദ്യത്തേത്.. തുടര്‍ന്ന് കാബ്രി, ഡ്രോയിങ് ജ്യോമെട്രി (Dr. Geo), കെ ഇന്ററാക്റ്റീവ് ജ്യാ മിതി (KIG), കാര്‍മെറ്റല്‍, ജിയോജിബ്ര, ജിയോമെട്രിയ, സിന്‍ഡെറല്ല തുടങ്ങി അനേകമെണ്ണം രൂപം കൊണ്ടു. ഇവ ഗ്നൂ / ലിനക്സ്, വിന്‍ഡോസ്, മക്കിന്റോഷ് തുടങ്ങി പല ഓപറേറ്റിങ് സിസ്റ്റങ്ങളില്‍ പ്രവര്‍ത്തിക്കുന്ന വയാണ്. കാബ്രി, സിന്‍ഡെറല്ല പോലുള്ള കുത്തക സോഫ്റ്റ് വേറുകളും കൂട്ടത്തിലുണ്ട്. Dr. Geo, Kig, Carmetal, Geogebra, Geometria എന്നിവ സ്വതന്ത്ര സോഫ്റ്റ് വേറുകളാണ്.

അമേരിക്കയിലുള്ള സാല്‍സ് ബര്‍ഗ് യൂണിവേഴ്സിറ്റിയിലെ മര്‍ക്കസ് ഹോവന്‍ വാര്‍ടര്‍ 2001 ല്‍ നിര്‍മി ക്കുകയും ഇപ്പോഴും മെച്ചപ്പെടുത്തിക്കൊണ്ടിരിക്കുകയും ചെയ്യുന്ന ഒരു ഇന്ററാക്ടീവ് സോഫ്റ്റ് വെയറാണ് ജിയോജിബ്ര.

Continue

Tuesday, January 4, 2011

Graph of Trigonometric Function

Applet

Steps:


Graph of Sin Function


1.Open a new geogebra file.
2.Mark the intersecting point O of X and Y axis.( Intersect Two Objects tool)
3.Draw a circle with centre at O and radius 1. ( Circle with Centre and Radius tool)
4.Mark the intersecting points Aand B of the circle with the X axis.( Intersect Two Objects tool)
.
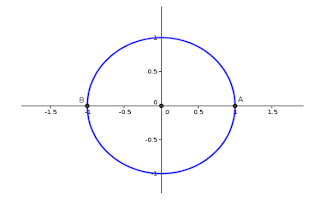


5.Click on the slider button and click once on the screen.
6.Apply the settings below and click apply .
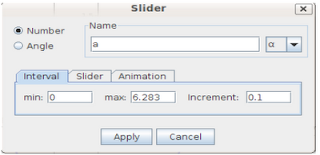
.


7.Using the tool Angle with given size , first click at A and then at O. At that tme a dialog box will appear as shown below. Remove the value 45o and insert the name of the slider namely a and click OK.
.
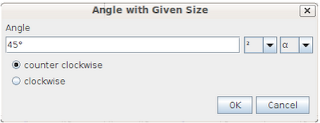


A new point C will appear on the circle. When we move the slider, the new point will move along the circle.
8.Draw a line through this point C which is perpendicular to the X axis.
9.Mark the intersecting point D of this perpendicular line with the X axis.
10.Using the tool Polygon draw a right triangle OCD and hide the perpendicular line.
11.Click once in the Input Field.
12.Type (a,0) in the Input field and press Enter. A new point E will appear on the X axis. When we move the slider, the new point will move along the X axis.
13.Draw a line through this point E, which is perpendicular to the X axis.
14.Draw a line through C, which is parallel to the X axis.
15.Mark the intersecting point F of the above two lines and hide the two lines.
16.Right click on F and give tickmark to the Trace On option.
17.Give animation to the slider. ( Right click on the slider --> give tickmark to the Animation On option).
18.Save the file.
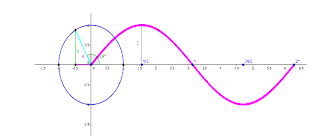
Sunday, January 2, 2011

Integration


Integration


Applet


1. Open a new geogebra file.
2. Click once in the Input Field.
3. Type x^2 in the Input field and press Enter. (f(x)= x2)
4. Type Integral [f,0,3] in the Input field to display the area under the parabola from 0 to 3.
The area measurement is displayed in the Algebra window.
5. Click on the move drawing pad button and drag the graph down to the bottom right of
the screen so all of the area under the curve is visible.
6. Click on the slider button and click once on the screen.
7. Apply the settings below and click apply


8. Click in the Input Field and type UpperSum [f ,0 ,3, n] and press Enter.
9. Click on the arrow button and drag the slider n to see the area of the rectangles approach the exact area.
10. Right click on the slider, choose Properties and click the slider tab to change the max
value to 200.
11. Drag the slider again.
12. Save the file.

Monday, November 29, 2010

Integration


Area between Two Curves _ Integration

Applet

Steps for constructing the applet

1.Open a new geogebra file
2.Create 3 sliders on number and give names a, c and m ( min: 0, Max : 10, Incr: 0.1 )
3.Create the function f ( f(x) = ax2 by typing in the Input field f(x) = a*x^2
4.Create the function g ( g(x) = mx + c by typing in the Input field g(x) = m*x + c
5.Mark the intersecting points A and B between the curve and the line using the tool Intersect Two objects
Continue